
Master Stable Cell Line Generation: A Step-by-Step Expert Protocol
Stable cell lines are indispensable tools in modern biomedical research. Whether you are overexpressing a target protein, knocking down a gene, or introducing a reporter construct, a well-characterized stable cell line provides reproducible, scalable, and physiologically relevant data. Yet the process is notoriously error-prone. This guide distills years of hands-on experience into a rigorous, publication-ready workflow.
Liposome-Mediated Transfection
Liposome-based delivery is the go-to approach for cell types with high transfection efficiency and when viral systems are unnecessary or restricted. Success hinges on three pillars: pure plasmid DNA, optimized drug selection, and precise timing.
Step 1 — Plasmid preparation
The expression vector must contain both the gene of interest and a selectable marker (e.g., puromycin resistance). Verify purity by spectrophotometry: the A260/A280 ratio should fall between 1.8 and 2.0, and the final concentration should be ≥ 500 ng/μL. Contaminants such as endotoxins or residual ethanol will kill cells before selection even begins.
Step 2 — Kill curve determination
Before transfection, determine the minimum lethal concentration of your selection drug. Seed wild-type cells into a 12- or 24-well plate. After 24 hours, replace the medium with complete medium containing a drug gradient (for puromycin: 0, 0.5, 1.0, 2.0, and 4.0 μg/mL). Refresh the drug-containing medium every 2–3 days and monitor under a microscope for 5–7 days. The lowest concentration that kills 100% of cells within this window is your working selection concentration.
Step 3 — Transfection
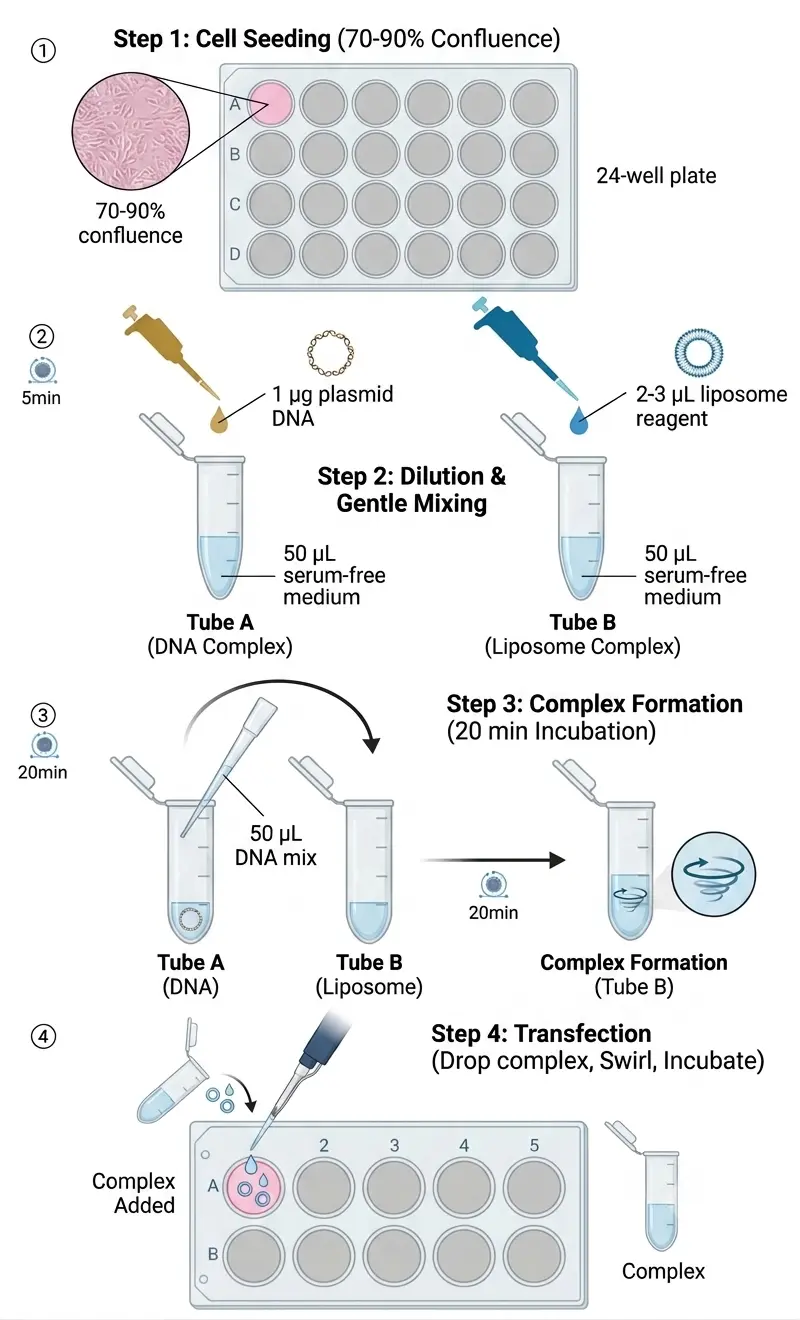
Cell seeding: Twenty-four hours before transfection, dissociate cells with trypsin, count, and seed into a 24-well plate so that confluence reaches 70–90% at the time of transfection.
Complex formation:
- Tube A: Dilute 1 μg plasmid DNA in 50 μL serum-free dilution medium; mix gently.
- Tube B: Dilute 2–3 μL liposome transfection reagent in 50 μL serum-free dilution medium; mix gently.
- Combine Tube A into Tube B, pipette or vortex gently, and incubate at room temperature for 15–20 minutes to allow DNA-liposome complexes to form.
Delivery: Aspirate the old medium, rinse once with PBS, and add fresh complete medium. Drop the transfection complex evenly into the well and swirl the plate gently. Always include an untransfected control. Return cells to a 37 °C, 5% CO2 incubator.
Lentiviral Transduction
Lentiviral vectors excel at delivering genes into hard-to-transfect, non-dividing, or primary cells. The workflow is longer but yields higher integration efficiency and more uniform expression.
Step 1 — Plasmid system
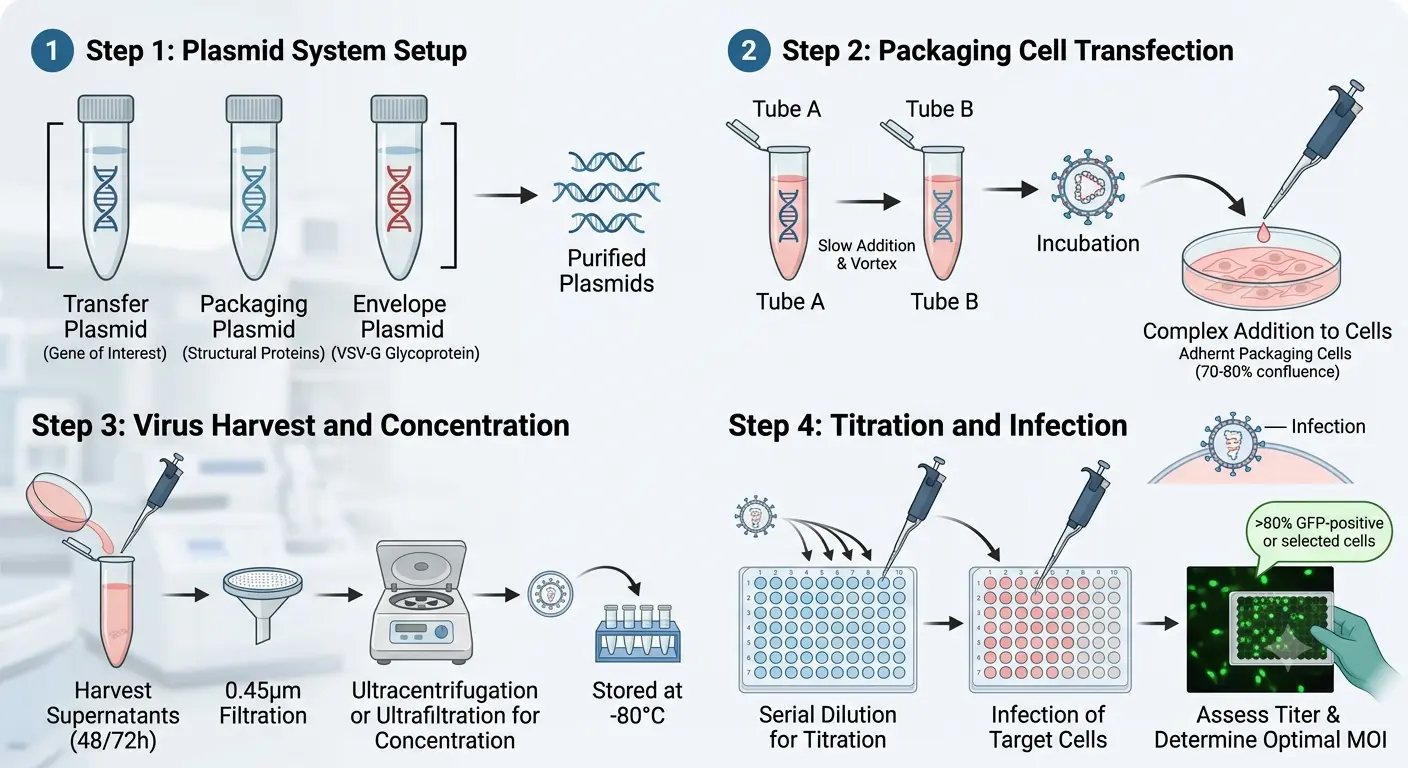
The standard three-plasmid system requires: (1) the transfer plasmid carrying your gene of interest and selection marker; (2) a packaging plasmid providing viral structural proteins; and (3) an envelope plasmid encoding the vesicular stomatitis virus G glycoprotein to broaden tropism. Purify all three plasmids and confirm A260/A280 ratios and concentrations as described above.
Step 2 — Packaging cell transfection
Seed packaging cells 24 hours prior so they reach 70–80% confluence at transfection. Prepare complexes as follows:
- Tube A: Mix the transfer, packaging, and envelope plasmids with serum-free dilution medium.
- Tube B: Mix the transfection reagent with serum-free dilution medium; incubate at room temperature for 5 minutes.
- Slowly add Tube B to Tube A, vortex vigorously, and incubate at room temperature for 15–20 minutes.
Add the complex dropwise to packaging cells in fresh complete medium, swirl gently, and incubate.
Step 3 — Virus harvest, concentration, and storage
Replace the medium with fresh complete medium 6–8 hours post-transfection to reduce cytotoxicity. Collect viral supernatants at 48 and 72 hours. Filter through a low-protein-binding membrane to remove cellular debris. Concentrate by ultracentrifugation or ultrafiltration to boost functional titers. Aliquot and store at −80 °C; avoid repeated freeze-thaw cycles, which can reduce titers by >50% per cycle.
Step 4 — Titration and infection
A pilot infection is mandatory to define the optimal multiplicity of infection (MOI). Seed target cells into a 24-well plate. Prepare a serial dilution of viral stock supplemented with infection enhancer. After 24 hours, replace with complete medium. At 72 hours, assess infection efficiency by fluorescence (if a reporter is present) or by drug selection. Choose the lowest MOI that yields >80% infected or surviving cells for your full-scale experiment.
For the full infection, seed target cells to 50–70% confluence. Dilute concentrated virus in complete medium with infection enhancer, add to cells, and incubate for 12–24 hours. Replace with fresh complete medium and proceed to selection.
Drug Selection and Single-Cell Cloning
Recovery and initial selection
Twenty-four to 48 hours after transfection or transduction, inspect cell morphology. Replace the medium with fresh complete medium and allow cells to recover. At 48–72 hours post-transfection, initiate selection by adding complete medium containing the predetermined drug concentration. Refresh the drug-containing medium every 2–3 days. During this period, untransfected control cells should detach and die completely. In the experimental group, most cells will perish, but a small fraction of resistant clones will survive and begin to proliferate into discrete colonies.
Single-cell cloning and expansion
Once resistant clones reach approximately 500–1,000 cells, proceed to monoclonal isolation:
- Dissociate all resistant cells with trypsin and generate a single-cell suspension.
- Count cells and perform serial dilutions in complete medium to reach 1–10 cells/mL.
- Dispense 100 μL per well into a 96-well plate (0.1–1 cell per well).
- Visually inspect each well under a microscope and mark wells confirmed to contain exactly one cell.
Monitor marked wells, refresh medium regularly, and when clones cover 30–50% of the well surface, passage sequentially into larger vessels: 96-well → 24-well → 6-well → T25 flask. Maintain selection pressure throughout expansion to ensure transgene stability.
Validation, banking, and functional testing
Molecular validation
When monoclonal cells reach confluence in 6-well plates or T25 flasks, validate before banking:
- mRNA level: Extract total RNA, reverse-transcribe to cDNA, and perform RT-qPCR with gene-specific primers. Compare expression levels against wild-type cells.
- Protein level — Western blot: Lyse cells, separate proteins by SDS-PAGE, transfer to membrane, and probe with target-specific antibodies.
- Protein level — immunofluorescence: Fix cells on coverslips, stain with primary and fluorescent secondary antibodies, and visualize under a fluorescence microscope to confirm expression and subcellular localization.
Cell banking
For clones that pass all validation criteria, expand to a large population, prepare cryovials in freezing medium, and store in liquid nitrogen. Generate multiple independent batches and label each vial with clone ID, passage number, date, and validated expression level.
Functional validation
Finally, confirm that the engineered phenotype matches your experimental objective. Design functional assays tailored to your gene: proliferation assays, migration or invasion assays, reporter gene assays, drug response curves, or co-culture experiments. A stable cell line is only as good as its functional integrity.
Key Success Factors
- Never skip the kill curve — drug sensitivity varies dramatically between cell lines and passages.
- Maintain selection pressure during expansion; relaxing it risks silencing or loss of the transgene.
- Single-cell cloning is non-negotiable for publication-grade data; pooled populations exhibit expression heterogeneity.
- Validate at both mRNA and protein levels; correlation is not guaranteed.
- Bank early-passage cells to minimize drift and maintain experimental consistency over years.
Need a reliable partner for your stable cell line project?
At Creative Bioarray, we operate as your dedicated research partner — not just a service provider. From experimental design to publication-ready data, we deliver end-to-end solutions including custom stable cell line generation, functional validation, and comprehensive assay support.
Our in-house cell repository is actively maintained and includes well-characterized lines ready for immediate project initiation. Our platforms cover Western blotting, CCK-8 viability assays, flow cytometry, dual-luciferase reporter assays, and vector construction — all executed under stringent quality controls.
Your email address will not be published. Required fields are marked *